The Elephant Security Descriptor Definition Language Editor
I am lazy and so simply copied a Word file I wrote into this web site which together with my inability to use Word properly should explain the bad formatting of this blog entry.
Direct comments, complaints and threats to me at ajbrehm@gmail.com.
The Elephant Security Descriptor Definition Language Editor
What is it?
The Elephant editor is an editor for Security Description Definition Language1 strings that were apparently introduced in Windows 2000 because the Windows NT binary format for security descriptors was not ideal for editing.
What can it do?
Elephant uses AclEdit.exe from the ABTokenTools (which must be in the same directory) to read and write Access Control Lists of named objects such as services, directories, files etc. It can also read and write security descriptors in SDDL or binary format in registry values.
It can display the SDDL received from AclEdit in SDDL and a table for (somewhat) easy editing.
It can currently set an object’s owner, DACL (Discretionary Access Control List), and inheritance.
What can’t it do?
Elephant cannot (yet) get or set permissions of objects without a unique name (like processes).
What will it be able to do?
I will try to add support for objects without a unique name and support OpenVMS’ security descriptor string format (which is easier to read and write).
Where can I find it?
It should be downloadable on
http://netneurotic.net/bin/Elephant-x64.zip
Note that you also need AclEdit from ABTokenTools which can be found at
http://netneurotic.net/bin/ABTokenTools-x64.zip
Replace “x64” with “x86”, “ARM”, or “ARM64” if you are brave. I sometimes make versions for those CPUs too.
Licence
Elephant is freeware but the source code is not available except upon request because I don’t want people to find it on the internet and base other programs on it. I don’t want my mistakes to spread.
The main window
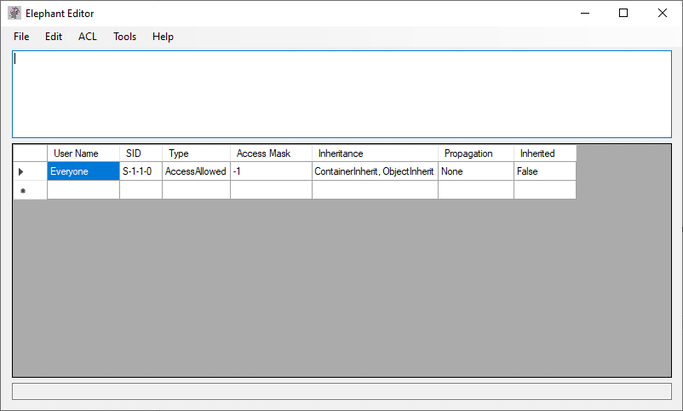
Elephant’s main window has four components.
On the top is a menu bar with several menus.
Below it is a text field for editing SDDL directly. This is also where a security descriptor will be loaded from an object.
Below that is a table that translates (attempts to translate) the SDDL string into a (more) human-readable form.
Below the table is a one-line text field that shows the path to the currently loaded object.
The File|Open Named Object menu
This opens the AclEdit Parameters window which is used to open a named object of a specified type. It is basically a GUI for AclEdit.
See below for a complete description.
The File|Open File menu
This will open a file’s security descriptor and is equivalent to giving an object path to a file and selecting the object type “File” in the AclEdit Parameters window.
The File|Open Directory menu
This will open a directory’s security descriptor and is equivalent to giving an object path to a directory and selecting the object type “File” (both directories and files are “files” in that sense) in the AclEdit Parameters window.
The File|Open Registry Key Or Value menu
This will open a registry key’s security descriptor or a registry value containing a security descriptor. Opening a registry key’s security descriptor here is equivalent to giving an object path to a registry key and selecting the object type “Registry Key” in the AclEdit Parameters window.
(Opening a registry value is not, because a registry value containing a security descriptor is not a named object.)
To open a registry key or a registry value this menu uses the Registry Access window. See below for a complete description.
The File|Save Security Descriptor menu
This opens the AclEdit Parameters window in write mode.
The File|Clear menu
This clears the current SDDL string and resets the main window’s contents.
The File|Exit menu
Hm.
The Edit|Toggle Column Display Mode menu
Toggles the table display between two different modes. Just try it out.
The Edit|Force Table Translation menu
Translates the table to match the SDDL or vice versa, in case that didn’t happen for some reason.
The Edit|Copy Table menu
Copies the table into the clipboard, I believe with tabs between columns.
The ACL|File and ACL|Registry menus
Generates SDDL for basic DACLs for file or registry objects.
The Tools|Scheduled Tasks menu
Opens the Registry Access window at the path for Windows Scheduled Tasks. Note that Windows Scheduled Task permissions are stored in registry values called “SD” in keys below the “Tree” key. Also note that such a value can only be edited after the key that hosts it can be written to which usually requires taking ownership which can be done by replacing the key’s ACL with one with a better owner (for example BA, Builtin\Administrators).
The AclEdit Parameters window
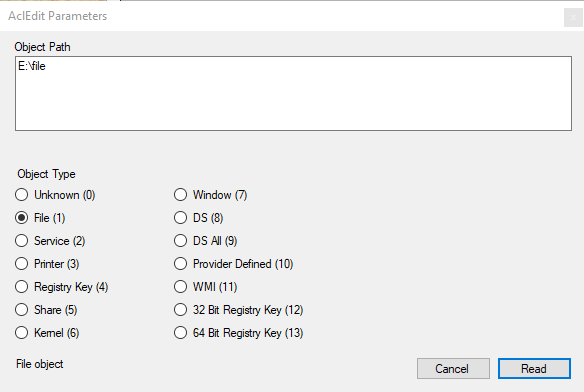
The Object Path text field takes an object path2 and pressing the Read or Write button will read or write the security descriptor of the object identified of the type selected below the Object Path text field.
Note that not all object types can be used with a path (but are listed here for completeness’ sake). Also note that not all object types necessarily understand all Access Control Elements Elephant can produce or you can invent.
It’s probably best never to create new ACLs but always to modify existing ACLs.
The Registry Access window
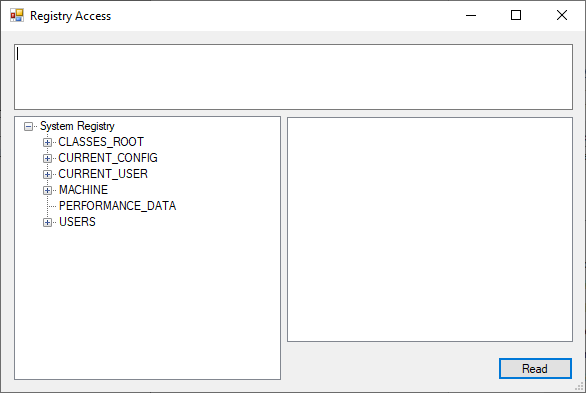
This window allows navigating the registry and selecting keys or values to load security descriptors. The selected path will be displayed in the textbox in the upper half of the window.
Note that the “Read” button will read whatever key or value is confirmed in the textbox, which should be the same as selected below it, but when in doubt, it’s the textbox that counts!
The About menu
Hm.
1 https://learn.microsoft.com/en-us/windows/win32/secauthz/security-descriptor-definition-language
2 Really.
Setting Registry Permissions without RegEdit
Last week a colleague of mine tried to configure registry permissions using C#’s RegistryKey.SetAccessControl().
It turns out this fails when the user owns the registry key but does not have the “Set Value” permission set in the ACL.
I tried repeating the experiment with PowerShell with the same result:
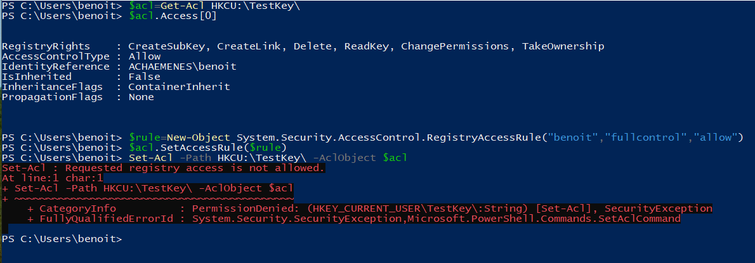
(Benoit Brisefer is my non-admin test user. I have others.)
In RegEdit Benoit could modify permissions on his key:
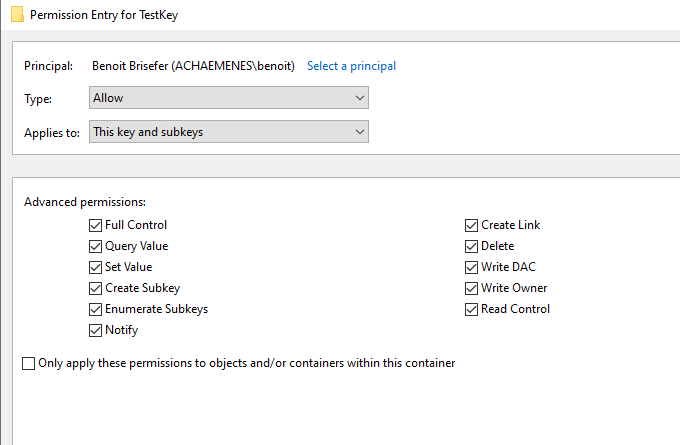
And once “Full Control” (or simply “Set Value”) was set, the Set-Acl command would work.
This is a bit annoying since it is not clear how one should set “Set Value” if one doesn’t already have it, or why “Set Value” is required not to set a value but to modify the key’s security descriptor.
I tried it out using in C and got the same results with opening a registry key and trying to set its security descriptor. Again with “Set Value” set I could set permissions and without “Set Value” I could not. This was using the RegOpenKeyEx() and RegOpenRegSetSecurity() APIs.
But there is another C API SetNamedSecurityInfo() which does work!
I assume the first method does not work because it opens the registry key first and modifies its security descriptor via the open key (whatever that means) and then “Set Value” is required. Perhaps .NET does it the same way and this affects both C#’s RegistryKey class as well as PowerShell’s Set-Acl cmdlet.
The second method works.
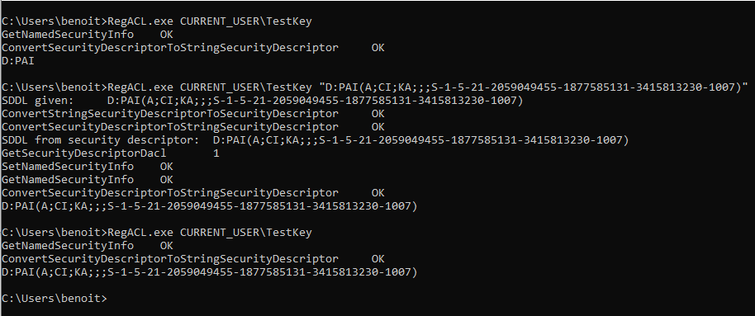
Benoit can configure his own key’s permissions with RegEdit but also with SetNamedSecurityInfo(). Output is given in SDDL format.
First RegACL call is outputting the security descriptor with “Full Control”, second and third are showing the security descriptor with “Set Value” and “Write DAC” respectively not set. Benoit does not have special privileges.
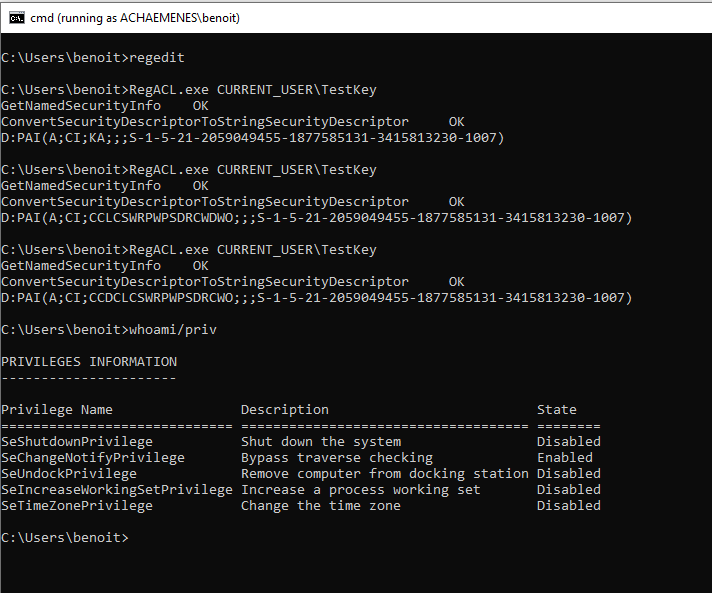
And then Benoit can write the access control list giving him “Full Control” even when the key’s DACL is empty:
You can find my badly-tested and entirely non-error-checking code here:
https://github.com/ajbrehm/ABTokenTools/tree/master/RegACL
Use with care on a computer you don’t care about!
Update: This has since become part of AclEdit.exe in ABTokenTools.
But it remains an experimental tool.
Setting vSphere Log Directory
Log into your vSphere host using ssh as root.
Assuming 608ee632-9b6d36e6-0286-b47af13db000 is the datastore you want to use:
cd /vmfs/volumes/608ee632-9b6d36e6-0286-b47af13db000
mkdir log
Or use any other directory name you like.
esxcli system syslog config get
Will show you the current log location, which, if you were came here from a search engine, is probably []/scratch/log and refuses to be changed.
esxcli system syslog config set —logdir=/vmfs/volumes/608ee632-9b6d36e6-0286-b47af13db000/log
As one line this will set the log directory to the directory created above.
Make active with:
esxcli system syslog reload
Check with
esxcli system syslog config get
Everything should be good now.
(This is not professional help. I just wrote this blog entry because it annoyed me that this could not be found anywhere. If you use vSphere you need professional help.)


Jenkinsing ABTokenTools
I set up a Jenkins server (on Windows) with MSBuild and a Git server (on FreeBSD) to compile ABTokenTools and deploy them to my web site automatically.
It turned out the only difficult part was the deployment via ssh.
A few hints:
- The Jenkins account (mine is DOMAIN\Jenkins$) must have full control in the directory where Jenkins is installed ("C:\Program Files\Jenkins” in my case).
- The Jenkins account also needs full control of its profile directory (likely “C:\Users\Jenkins$” or something similar). This is probably the case already.
- The Jenkins account furthermore needs read and write access to other directories depending on what Jenkins jobs are supposed to be doing.
- If you are using a managed service account to run Jenkins, as you probably should, use psexec -u domain\jenkins$ -p ~ cmd from a ssh session to log into the Jenkins service account, assuming it is called jenkins$. (In an RDP session you should probably add -i to the psexec parameters. If you are running Jenkins as LocalSystem use -s.)
- Make use of the -v parameter of scp. It will tell you where scp is stuck.
- Make sure the known_hosts file is formatted correctly. You cannot have any questions unanswered when Jenkins runs scp.
- Use the -i parameter of scp to use a specific id_rsa secret key file.
- Use a batch file command powershell Compress-Archive -DestinationPath myzipfile -Path myfolderwithmyartefacts to zip the artefacts for deployment.
See the original article on ABTokenTools which I will hopefully update at some point.
Downloads (perhaps occassionally updated):
PocketBook Color
As part of my never-ending quest to find a ebook reader for comic books, I stumbled upon the PocketBook Color, made by, I believe, a Russian-Swiss company and featuring a color e-ink display.

The colors are really crips and convincing, the home menu is nicely presented and easy to use. This is better than my Kindle. Just like all e-ink devices display refreshes are very slow, and I think they are even slower than on my Kindle. You don’t want to turn a page on this device.

I don’t know why the colours are completely different on the screenshots than seen on the device. I could try to change this in the settings, perhaps, but the pages in the settings are painfully slow as well.
The display is really too small for a comic page and while there is a theoretical landscape mode to present the upper and lower half of a page bigger, the e-ink display cannot scroll and always cuts through a row of pictures, as seen in this lower half of a page.

The settings menus remind me of a tablet computer rather than an ebook reader device but the actual hardware is not so impressive.
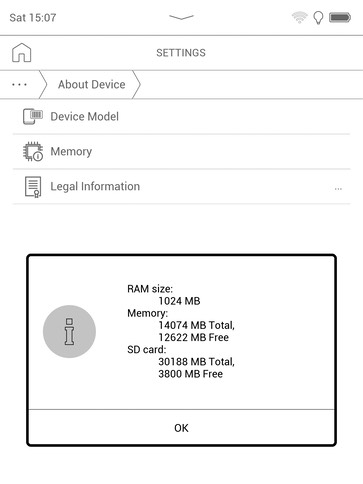
1 GB of RAM and (nominaly) 16 GB of internal storage are not very impressive. The storage is certainly not sufficient for a comic book collection (or any ebooks that contain lots of colored pictures). According to the manual the device supports SD cards only up to 32 GB. My SD card is full already.
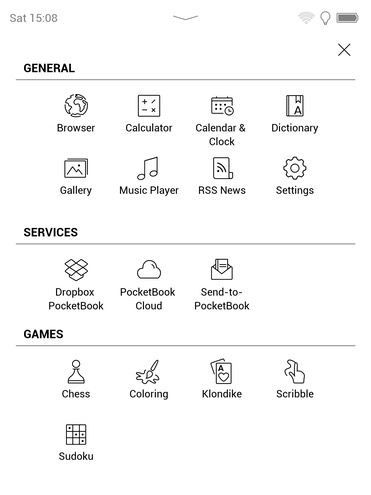
The device has some built-in apps rather than booting directly into a reader app and even offers some games which are actually not bad. I think it is possible to add more games and I also found instructions somewhere for download of a Linux-based SDK that allows creation of custom apps.
The web browser app was a nice surprise and works really (if slowly).
But the device really shines if used for ebooks with color pictures. It comes with a built-in library of out-of-copyright books in multiple languages.

And that’s the thing, while the device’s screen is too small for pre-formatted comic book and PDF files, it is large enough for ebooks since it can format them itself and present them in a readable format.

It is a great device to read comic books if you can read small fonts.
All-in-all this is not a bad device and if you have money to waste on something, this could be an option.
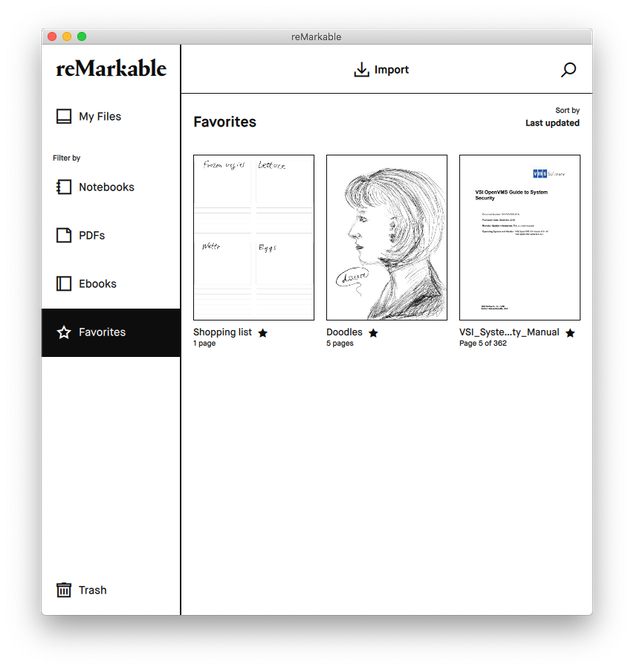
reMarkable 2
I bought a reMarkable 2.

I saw it advertised somewhere, I needed a better way to write shopping lists, this seemed ideal.
It is mainly meant for note keeping but can also be used for drawing and as an ebook reader.
It is a nice enough product. I use it for shopping lists.

It comes with an associated cloud over which files, created and otherwise, are meant to be synced. At the other end of the cloud are applications for Windows, macOS, iOS and Android which allow copying the created notes and drawings as well as supplying the reMarkable with ebooks.
And this is where the first problem arises. The ebooks sent to the reMarkable are synced to all associated computers and it is unlikely that they are needed anywhere except on the reMarkable itself. Furthermore, syncing is not very fast and, what is worse, it is not obvious what triggers a sync. I often find myself wondering if I even saved a note because it simply won’t show up on my phone when I need it.
The associated application looks nice enough.
It is less intuitive than it seems at first but at least it does not have many annoying features. It is very simple and serves its purpose (aside from the unnecessary syncing of ebooks to every associated computer and phone).
The translation of hand-written text into computer-readable text works reasonably well (but is not really a necessary feature for shopping lists, perhaps for note-taking).

One unfortunate non-feature is the alleged ability to change the screen perspective from portrait to landscape. It doesn’t work. It changes the position of the toolbar from left to bottom but it does not shift the document.
This means that the theoretical landscape mode is somewhat useless. Documents created in it will always be displayed in landscape mode and documents created without it will always be displayed in portrait mode regardless of current setting.
This is rather problematic since the device cannot zoom properly and I found reading a PDF impossible on the display because of that. Since it is not obvious whether and how documents can be shifted from portrait to landscape mode and in combination with the badly-to-not working zoom the device is somewhat useless as an ebook reader.
The reMarkable 2 can send notes and pictures via email. However, it cannot receive emails and nor, apparently, can it use a custom email account, instead it uses the reMarkable cloud for sending emails. I would have preferred being able to send emails to it and to use a dedicated email account for the tablet.
The tablet’s functionality with the pen is, as I should say, indeed remarkable. Writing and drawing is easily done, works better than I had expected and using the device is simply fun.

I did not draw any of the pictures here shown. I barely managed to write readable notes. But I am told the reMarkable is very well suited for drawing.
One very nice feature is the ssh server.
It is possible to connect to the reMarkable 2 and log in using a password found in the settings.
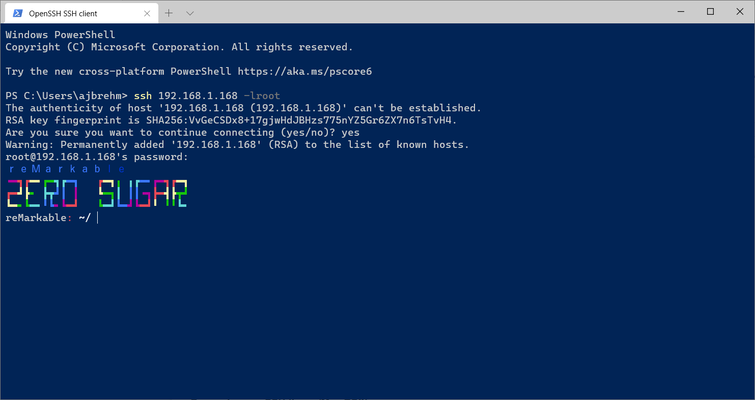
Some investigation showed that the reMarkable 2 is running Linux on some kind or ARMv7 CPU. There was no obvious barrier to creating user accounts and installing further software.
However, the reMarkable 2’s storage space is quite limited with 8 GB. While it is possible to read ebooks and PDFs on the reMarkable (with the aforementioned caveats), it is really a temporary host for those files. Forget about replacing your ebook reader, tablet or, as the maker suggests, laptop with this device.
This is a pure home device for the area between the dinner table and the sofa.
ABTokenTools
Updated 4/12/2022
Some time ago already I had written a few utilities to manipulate Windows account security settings. I use them at work all the time because they are more flexible and easier to understand than the built-in GUI tools (and much much easier to use than the built-in CLI tools).
I have now updated the tools to use (mostly) WCHAR and standard I/O, so output is now redirectable. Everything is (should be) statically linked and does not require the Visual C runtime library installed. TokenTest requires the .NET Framework version 4. Some of the tools now display some help.
Source: https://github.com/ajbrehm/ABTokenTools
Download binaries (in ZIP archives) of the newest versions here:
- ABTokenTools x86 (for 32 bit PCs, will run on all current Windows 10)
- ABTokenTools x64 (for 64 bit PCs, will run on all current 64 bit Windows 10)
- ABTokenTools ARM (for 32 bit WOA devices, will run on 64 bit ARM Windows 10)
- ABTokenTools ARM64 (for 64 bit WOA devices, will run only on 64 bit ARM Windows 10)
Do refer to the README.MD in the repository to find out what they do.
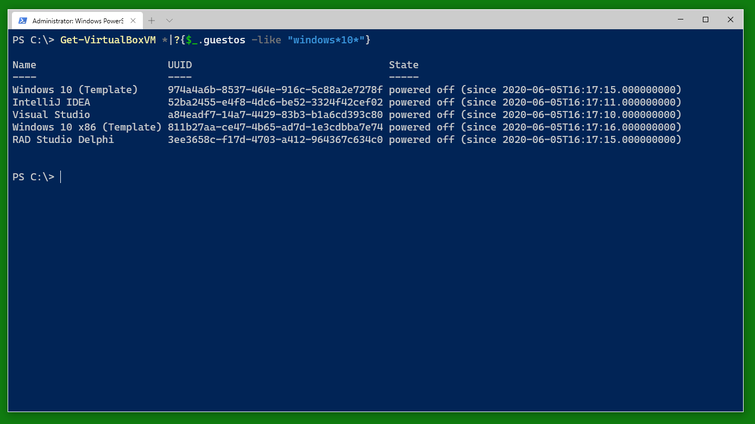
NNVirtualBoxPowerShellModule - An Introduction
NNVirtualBoxPowerShellModule is a PowerShell module written in PowerShell that allows control of (some) VirtualBox features via PowerShell. NNVirtualBoxPowerShellModule is available on GitHub.
Here I will try to explain how to use NNVirtualBoxPowerShellModule to run Get-WindowsUpdate and Install-WindowsUpdate on Windows 10 VMs. (This assumes that the module PSWindowsUpdate is installed on the Windows 10 VMs.)
This example will give you an idea of what NNVirtualBoxPowerShellModule can already do.
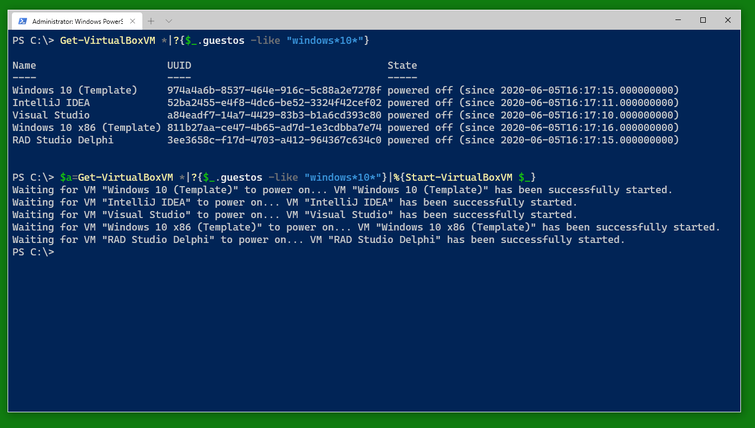
Use Get-VirtualBoxVM * to get a list of all VirtualBox VMs on the computer. Use a filter to find specific VMs, for example those running Windows 10.
Then start the VMs you want with Start-VirtualBoxVM. I recommend writing them into a variable (here $a) so you can easily work with them when they are running. The VMs will report back as having been started immediately. Note that the variable will not know if their status changes to powered off again.
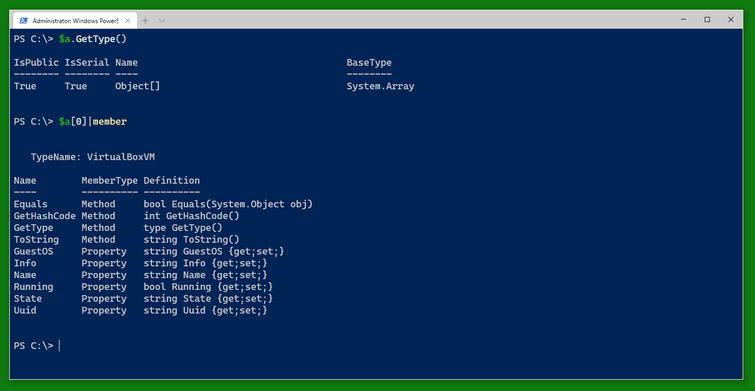
After you started the VMs, you can see them displayed as the contents of the variable $a.

The variable $a is an array and contains several variables of the type VirtualBoxVM. The type VirtualBoxVM has several interesting fields. Note that the special field .Info which is not generally displayed contains all the information VBoxManage.exe returns about the VM. The other fields are windows into the .Info field or (like .Running) convenience fields.
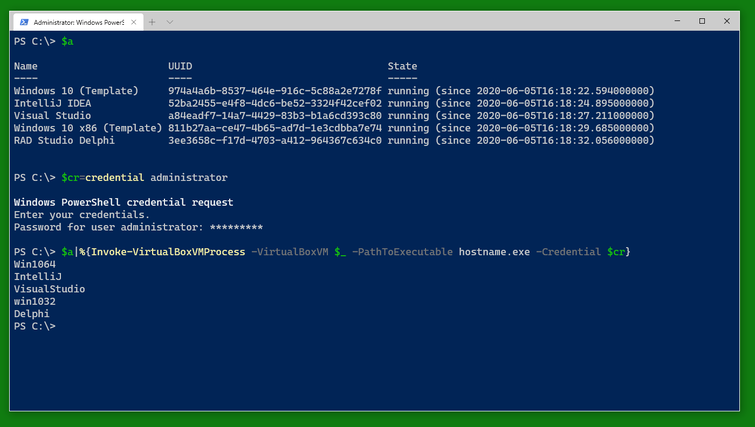
To do something to the VMs, you can use Invoke-VirtualBoxVMProcess which starts a program on a VM as the user given in the credential handed to Invoke-VirtualBoxVMProcess.
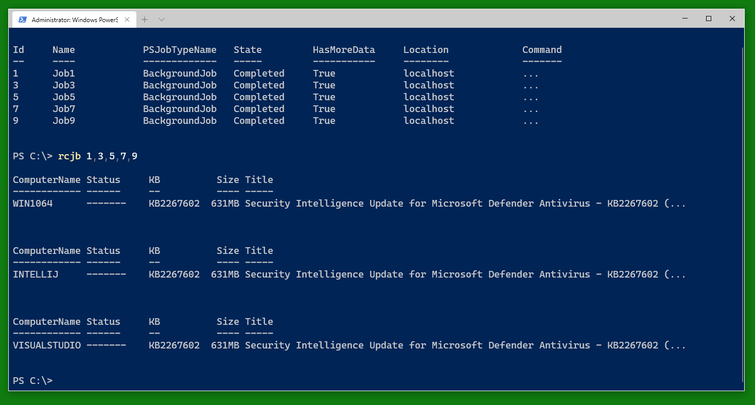
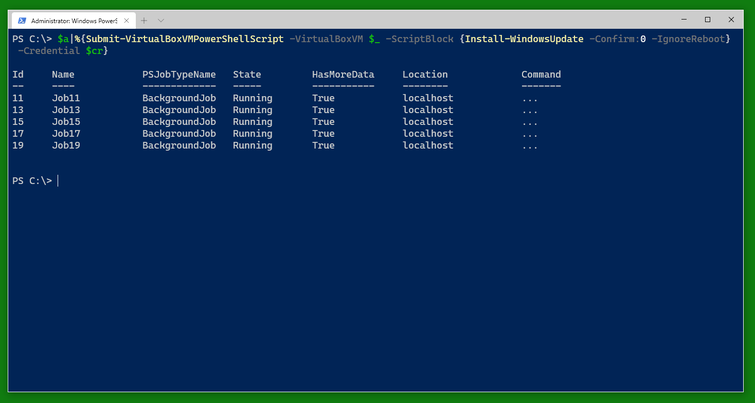
You can use a similar cmdlet, Invoke-VirtualBoxVMPowerShellScript to run a PowerShell script block. Note that the switch -AsJob runs the cmdlet as a PowerShell background job and is also available with Invoke-VirtualBoxVMProcess.

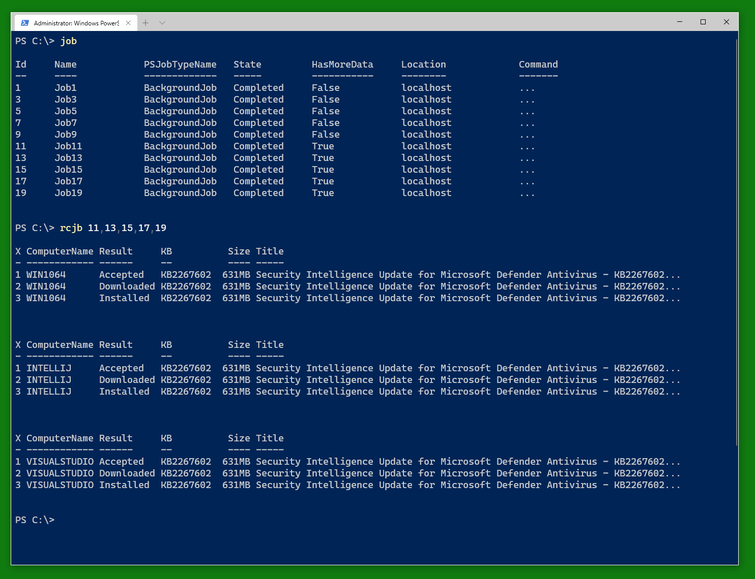
You can check the status of the jobs as usual with Get-Job and Receive-Job. (Note that only three of the five VMs are in need of this update shown.)
An alternative to Invoke-VirtualBoxVMPowerShellScript -AsJob is Submit-VirtualBoxVMPowerShellScript which also runs a PowerShell script on the VM as in a PowerShell background job. There is a corresponding Submit-VirtualBoxVMProcess.
It’s quite possible for all this to work.
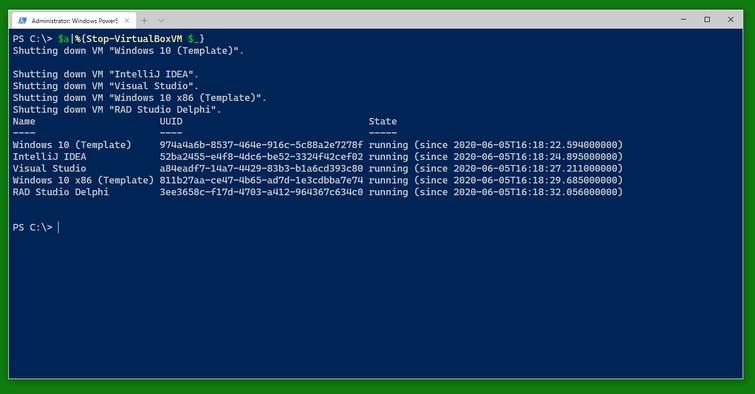
And when you are done, you can stop the VMs using Stop-VirtualBoxVM. (This will shutdown the VMs. There is a switch -PowerOff to power them off instead.) Note that the result still shows the VMs as running. You can do a Get-VirtualBoxVM * to find out which ones have finally shut down and which ones are still running for some reason (still shutting down, updating, blocked from shutdown somehow).
Exercise: Use Open-VirtualBoxVMConsole to open the console window of a running VM or start and open the console window of a non-running VM.
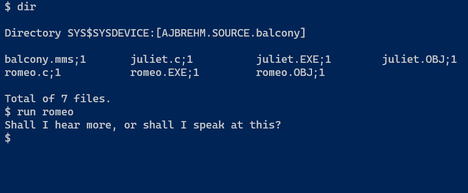
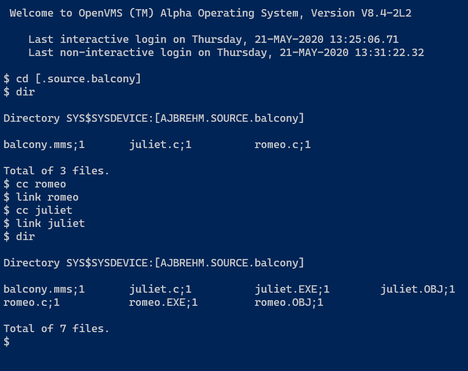
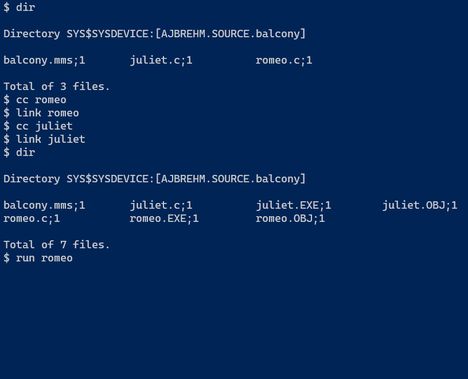
Romeo and Juliet in OpenVMS
The Romeo and Juliet Balcony scene in OpenVMS
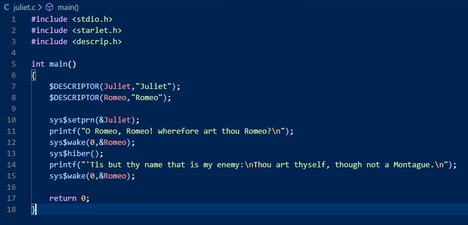
Featuring romeo.c as Romeo

And juliet.c as Juliet
Director: VSI C
Producer: Microsoft Visal Studio Code
Theatre: OpenVMS 8.4 AXP
Building
Terminal 1 (Romeo, waiting below the balcony):
Terminal 2 (Juliet):
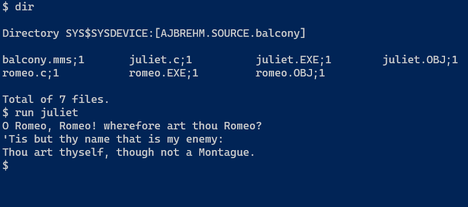
Terminal 1 (Romeo, reacting to Juliet):